How to setup a service mesh using Linkerd in Kubernetes
Here in this article we will try to setup a service mesh using Linkerd in Kubernetes cluster
Test Environment
- Fedora 41 server
- go 1.18
- Docker version 28.5.2
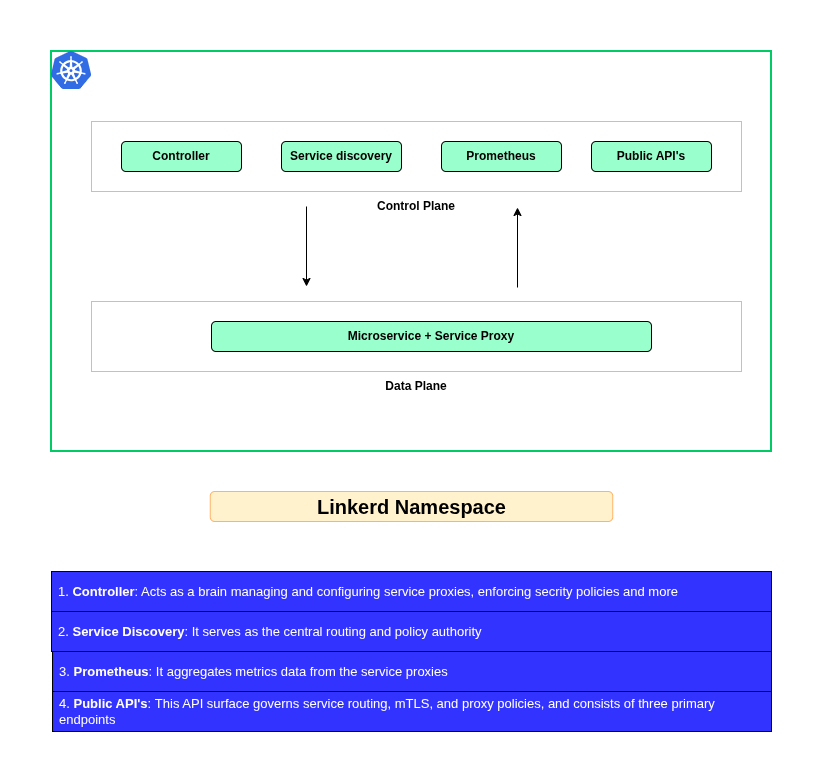
What is Service Mesh in Kubernetes
A service mesh is a dedicated infrastructure layer in a Kubernetes cluster that manages, secures, and observes communication between microservices. It handles routing, load balancing, and encryption without requiring changes to your application’s source code.
A service mesh divides its functionality into two primary components:
- Data Plane: Consists of lightweight network proxies (commonly based on Envoy Proxy) deployed as “sidecars” alongside every service. All incoming and outgoing network traffic for a service goes through this proxy.
- Control Plane: The management and configuration engine. It programs the data plane proxies, directing them on how to route traffic, enforce security policies, and collect telemetry data.
High Level Architecture
Procedure
Step1: Ensure Kubernetes cluster running
As a first step you need to ensure that you have a working kubernetes cluster along with kubectl installed. Follow “How to setup kubernetes cluster using kind” to setup a sample three node kubernetes cluster.
Here is the kind kubernetes cluster that i will be using for this demo.
admin@linuxser:~/kind_cluster$ kubectl get nodes
NAME                  STATUS   ROLES           AGE     VERSION
k8dev-control-plane   Ready    control-plane   2m20s   v1.34.0
k8dev-worker          Ready    <none>          2m7s    v1.34.0
k8dev-worker2         Ready    <none>          2m7s    v1.34.0
Step2: Install Linkerd CLI
Here we are going to download and install the Linkerd cli tool which will be used to interact with the Linkerd deployment.
admin@linuxser:~/kind_cluster$ export LINKERD2_VERSION=edge-26.6.3

admin@linuxser:~/kind_cluster$ curl --proto '=https' --tlsv1.2 -sSfL https://run.linkerd.io/install-edge | sh
...
Download complete!

Linkerd edge-26.6.3 was successfully installed 🎉


Add the linkerd CLI to your path with:

  export PATH=$PATH:/home/admin/.linkerd2/bin

Now run:

  # install the GatewayAPI CRDs
  kubectl apply -f https://github.com/kubernetes-sigs/gateway-api/releases/download/v1.2.1/standard-install.yaml

  linkerd check --pre                         # validate that Linkerd can be installed
  linkerd install --crds | kubectl apply -f - # install the Linkerd CRDs
  linkerd install | kubectl apply -f -        # install the control plane into the 'linkerd' namespace
  linkerd check                               # validate everything worked!

You can also obtain observability features by installing the viz extension:

  linkerd viz install | kubectl apply -f -  # install the viz extension into the 'linkerd-viz' namespace
  linkerd viz check                         # validate the extension works!
  linkerd viz dashboard                     # launch the dashboard

Looking for more? Visit https://linkerd.io/2/tasks
Now lets add linkerd cli to PATH environment variable and restart the shell terminal for the changes to take effect.
admin@linuxser:~/kind_cluster$ cat ~/.bashrc | grep -i linkerd
### Linkerd
export PATH="$PATH:/home/admin/.linkerd2/bin"
Verify linkerd is installed successfully.
admin@linuxser:~/kind_cluster$ linkerd version
Client version: edge-26.6.3
Server version: unavailable
NOTE: Server version is showing unavailable as we Linkerd control plane is not yet installed onto kubernetes cluster.
Step3: Install Gateway API
Linkerd provides its features through the Gateway API. For this we need to have the Gateway API CRD’s installed onto the kubernetes cluster.
admin@linuxser:~/kind_cluster$ kubectl apply -f https://github.com/kubernetes-sigs/gateway-api/releases/download/v1.2.1/standard-install.yaml
Warning: unrecognized format "int64"
customresourcedefinition.apiextensions.k8s.io/gatewayclasses.gateway.networking.k8s.io created
Warning: unrecognized format "int32"
customresourcedefinition.apiextensions.k8s.io/gateways.gateway.networking.k8s.io created
customresourcedefinition.apiextensions.k8s.io/grpcroutes.gateway.networking.k8s.io created
customresourcedefinition.apiextensions.k8s.io/httproutes.gateway.networking.k8s.io created
customresourcedefinition.apiextensions.k8s.io/referencegrants.gateway.networking.k8s.io created
Step4: Validate Kubernetes Cluster
To ensure that the kubernetes cluster is now ready to be installed with the Linkerd control plan, we can run the below check using the linkerd cli tool.
admin@linuxser:~/kind_cluster$ linkerd check --pre
kubernetes-api
--------------
√ can initialize the client
√ can query the Kubernetes API

kubernetes-version
------------------
√ is running the minimum Kubernetes API version

pre-kubernetes-setup
--------------------
√ control plane namespace does not already exist
√ can create non-namespaced resources
√ can create ServiceAccounts
√ can create Services
√ can create Deployments
√ can create CronJobs
√ can create ConfigMaps
√ can create Secrets
√ can read Secrets
√ can read extension-apiserver-authentication configmap
√ no clock skew detected

linkerd-version
---------------
√ can determine the latest version
√ cli is up-to-date

Status check results are √
Step 5: Install Linkerd onto your cluster
Now that the CLI is installed and the Kubernetes cluster is ready, we can install the Linkerd onto our cluster.
The install –crds command installs Linkerd’s Custom Resource Definitions (CRDs), which must be installed first.
admin@linuxser:~/kind_cluster$ linkerd install --crds | kubectl apply -f -
Rendering Linkerd CRDs...
Next, run `linkerd install | kubectl apply -f -` to install the control plane.

customresourcedefinition.apiextensions.k8s.io/authorizationpolicies.policy.linkerd.io created
customresourcedefinition.apiextensions.k8s.io/egressnetworks.policy.linkerd.io created
Warning: unrecognized format "int64"
customresourcedefinition.apiextensions.k8s.io/httplocalratelimitpolicies.policy.linkerd.io created
Warning: unrecognized format "int32"
customresourcedefinition.apiextensions.k8s.io/httproutes.policy.linkerd.io created
customresourcedefinition.apiextensions.k8s.io/meshtlsauthentications.policy.linkerd.io created
customresourcedefinition.apiextensions.k8s.io/networkauthentications.policy.linkerd.io created
customresourcedefinition.apiextensions.k8s.io/serverauthorizations.policy.linkerd.io created
customresourcedefinition.apiextensions.k8s.io/servers.policy.linkerd.io created
Warning: unrecognized format "float"
customresourcedefinition.apiextensions.k8s.io/serviceprofiles.linkerd.io created
customresourcedefinition.apiextensions.k8s.io/externalworkloads.workload.linkerd.io created
Step6: Install Linkerd control plane
Once the Linkerd CRD resources are installed, we can install the Linkerd control plane as shown below.
admin@linuxser:~/kind_cluster$ linkerd install | kubectl apply -f -
namespace/linkerd created
clusterrole.rbac.authorization.k8s.io/linkerd-linkerd-identity created
clusterrolebinding.rbac.authorization.k8s.io/linkerd-linkerd-identity created
serviceaccount/linkerd-identity created
clusterrole.rbac.authorization.k8s.io/linkerd-linkerd-destination created
clusterrolebinding.rbac.authorization.k8s.io/linkerd-linkerd-destination created
serviceaccount/linkerd-destination created
secret/linkerd-sp-validator-k8s-tls created
validatingwebhookconfiguration.admissionregistration.k8s.io/linkerd-sp-validator-webhook-config created
secret/linkerd-policy-validator-k8s-tls created
validatingwebhookconfiguration.admissionregistration.k8s.io/linkerd-policy-validator-webhook-config created
clusterrole.rbac.authorization.k8s.io/linkerd-policy created
clusterrolebinding.rbac.authorization.k8s.io/linkerd-destination-policy created
role.rbac.authorization.k8s.io/remote-discovery created
rolebinding.rbac.authorization.k8s.io/linkerd-destination-remote-discovery created
role.rbac.authorization.k8s.io/linkerd-heartbeat created
rolebinding.rbac.authorization.k8s.io/linkerd-heartbeat created
clusterrole.rbac.authorization.k8s.io/linkerd-heartbeat created
clusterrolebinding.rbac.authorization.k8s.io/linkerd-heartbeat created
serviceaccount/linkerd-heartbeat created
clusterrole.rbac.authorization.k8s.io/linkerd-linkerd-proxy-injector created
clusterrolebinding.rbac.authorization.k8s.io/linkerd-linkerd-proxy-injector created
serviceaccount/linkerd-proxy-injector created
secret/linkerd-proxy-injector-k8s-tls created
mutatingwebhookconfiguration.admissionregistration.k8s.io/linkerd-proxy-injector-webhook-config created
configmap/linkerd-config created
role.rbac.authorization.k8s.io/ext-namespace-metadata-linkerd-config created
secret/linkerd-identity-issuer created
configmap/linkerd-identity-trust-roots created
service/linkerd-identity created
Warning: spec.SessionAffinity is ignored for headless services
service/linkerd-identity-headless created
deployment.apps/linkerd-identity created
service/linkerd-dst created
service/linkerd-dst-headless created
service/linkerd-sp-validator created
service/linkerd-policy created
service/linkerd-policy-validator created
deployment.apps/linkerd-destination created
cronjob.batch/linkerd-heartbeat created
deployment.apps/linkerd-proxy-injector created
service/linkerd-proxy-injector created
secret/linkerd-config-overrides created
Step7: Install Demo Application
We can now try to deploy a sample application from Linkerd: Getting Started docs and install into the kubernetes cluster.
admin@linuxser:~/kind_cluster$ curl --proto '=https' --tlsv1.2 -sSfL https://run.linkerd.io/emojivoto.yml \
  | kubectl apply -f -
namespace/emojivoto created
serviceaccount/emoji created
serviceaccount/voting created
serviceaccount/web created
service/emoji-svc created
service/voting-svc created
service/web-svc created
deployment.apps/emoji created
deployment.apps/vote-bot created
deployment.apps/voting created
deployment.apps/web created
Let’s expose the service on host port as shown below to validate the application.
admin@linuxser:~/kind_cluster$ kubectl -n emojivoto port-forward svc/web-svc 8080:80
Forwarding from 127.0.0.1:8080 -> 8080
Forwarding from [::1]:8080 -> 8080
Step8: Inject linkerd mesh
Now that our application is deployed, we can add the data plane to our workloads (called “meshing” or “injecting” your workloads) using the below command.
This command retrieves all of the deployments running in the emojivoto namespace, runs their manifests through linkerd inject, and then reapplies it to the cluster. This is execute a rolling deployment onto our workload and update each pod with the data plane’s proxies.
admin@linuxser:~/kind_cluster$ kubectl get -n emojivoto deploy -o yaml \
  | linkerd inject - \
  | kubectl apply -f -

deployment "emoji" injected
deployment "vote-bot" injected
deployment "voting" injected
deployment "web" injected

deployment.apps/emoji configured
deployment.apps/vote-bot configured
deployment.apps/voting configured
deployment.apps/web configured
We can verify that everything is working as expected in the Linkerd dataplan using the below command.
admin@linuxser:~/kind_cluster$ linkerd -n emojivoto check --proxy
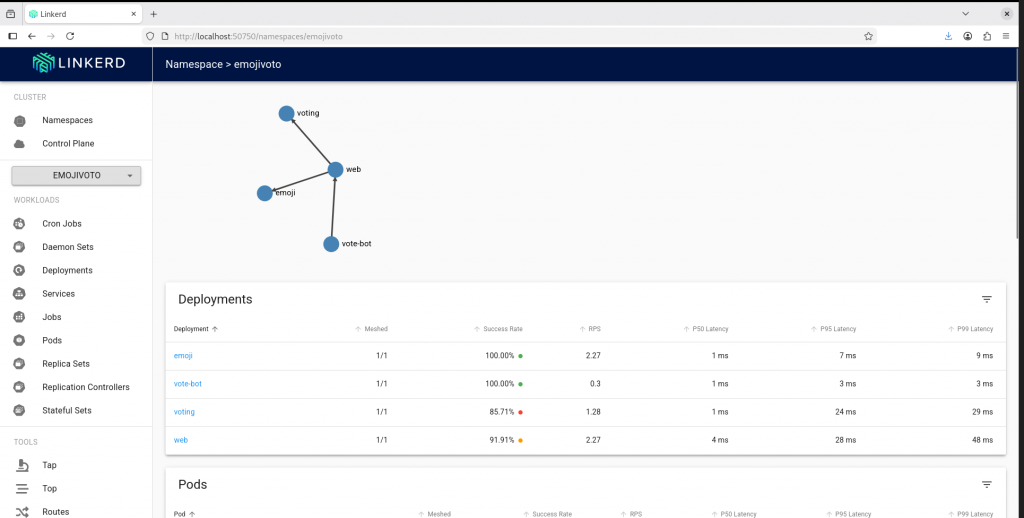
Step9: Explore Linkerd
Here we will install the viz extension, which will install an on-cluster metric stack and dashboard.
admin@linuxser:~/kind_cluster$ linkerd viz install | kubectl apply -f - # install the on-cluster metrics stack
namespace/linkerd-viz created
clusterrole.rbac.authorization.k8s.io/linkerd-linkerd-viz-metrics-api created
clusterrolebinding.rbac.authorization.k8s.io/linkerd-linkerd-viz-metrics-api created
serviceaccount/metrics-api created
clusterrole.rbac.authorization.k8s.io/linkerd-linkerd-viz-prometheus created
clusterrolebinding.rbac.authorization.k8s.io/linkerd-linkerd-viz-prometheus created
serviceaccount/prometheus created
clusterrole.rbac.authorization.k8s.io/linkerd-linkerd-viz-tap created
clusterrole.rbac.authorization.k8s.io/linkerd-linkerd-viz-tap-admin created
clusterrolebinding.rbac.authorization.k8s.io/linkerd-linkerd-viz-tap created
clusterrolebinding.rbac.authorization.k8s.io/linkerd-linkerd-viz-tap-auth-delegator created
serviceaccount/tap created
rolebinding.rbac.authorization.k8s.io/linkerd-linkerd-viz-tap-auth-reader created
secret/tap-k8s-tls created
apiservice.apiregistration.k8s.io/v1alpha1.tap.linkerd.io created
role.rbac.authorization.k8s.io/web created
rolebinding.rbac.authorization.k8s.io/web created
clusterrole.rbac.authorization.k8s.io/linkerd-linkerd-viz-web-check created
clusterrolebinding.rbac.authorization.k8s.io/linkerd-linkerd-viz-web-check created
clusterrolebinding.rbac.authorization.k8s.io/linkerd-linkerd-viz-web-admin created
clusterrole.rbac.authorization.k8s.io/linkerd-linkerd-viz-web-api created
clusterrolebinding.rbac.authorization.k8s.io/linkerd-linkerd-viz-web-api created
serviceaccount/web created
service/metrics-api created
deployment.apps/metrics-api created
server.policy.linkerd.io/metrics-api created
authorizationpolicy.policy.linkerd.io/metrics-api created
meshtlsauthentication.policy.linkerd.io/metrics-api-web created
networkauthentication.policy.linkerd.io/kubelet created
configmap/prometheus-config created
service/prometheus created
deployment.apps/prometheus created
server.policy.linkerd.io/prometheus-admin created
authorizationpolicy.policy.linkerd.io/prometheus-admin created
service/tap created
deployment.apps/tap created
server.policy.linkerd.io/tap-api created
authorizationpolicy.policy.linkerd.io/tap created
clusterrole.rbac.authorization.k8s.io/linkerd-tap-injector created
clusterrolebinding.rbac.authorization.k8s.io/linkerd-tap-injector created
serviceaccount/tap-injector created
secret/tap-injector-k8s-tls created
mutatingwebhookconfiguration.admissionregistration.k8s.io/linkerd-tap-injector-webhook-config created
service/tap-injector created
deployment.apps/tap-injector created
server.policy.linkerd.io/tap-injector-webhook created
authorizationpolicy.policy.linkerd.io/tap-injector created
networkauthentication.policy.linkerd.io/kube-api-server created
service/web created
deployment.apps/web created
serviceprofile.linkerd.io/metrics-api.linkerd-viz.svc.cluster.local created
serviceprofile.linkerd.io/prometheus.linkerd-viz.svc.cluster.local created
We can verify the linkerd dashboard using the following command.
admin@linuxser:~/kind_cluster$ linkerd viz dashboard &
Linkerd dashboard available at:
http://localhost:50750
Grafana dashboard available at:
http://localhost:50750/grafana
Opening Linkerd dashboard in the default browser
Hope you enjoyed reading this article. Thank you..
Leave a Reply
You must be logged in to post a comment.