How to persist Nexus OSS artifacts in AWS S3 object store
Here in this article we will use AWS S3 Object Store as the backend to store the Nexus OSS repository artifacts providing an optimized solution for storage.
Test Environment
- Fedora 41 server
- Nexus 3.92.2
- Postgres 17.6-alpine
Blob Stores
Blob stores are locations on disk or in the cloud for Nexus Repository to store binary artifacts. Sonatype Nexus Repository OSS fully supports Amazon S3 as a native blob store engine without requiring external plugins. Using an AWS S3 Blob Store allows us to scale storage capacity seamlessly, reduce local disk dependency, and significantly enhance availability.
NOTE: It is recommended to use AWS S3 as blob store when Nexus Repository is running on EC2 instances within AWS to avoid latency issues.
High Level Architecture
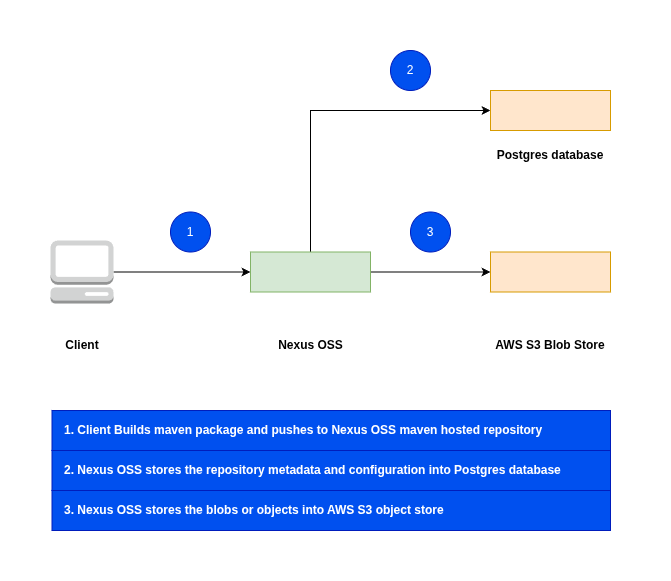
If you are interested in watching the video. Here is the YouTube video on the same step by step procedure outlined below.
Procedure
Step1: Ensure Docker and Docker compose installed
As a pre-requisite step ensure that docker and docker-compose is installed and running.
admin@linuxscratch:nexus_oss$ docker -v
Docker version 29.2.1, build a5c7197

admin@linuxscratch:nexus_oss$ docker compose version
Docker Compose version v5.0.2

admin@linuxscratch:nexus_oss$ sudo systemctl start docker.service
admin@linuxscratch:nexus_oss$ sudo systemctl status docker.service
Step2: Ensure Nexus OSS service installed
Here we will be setting up Nexus OSS service with Postgres database as the backend to manage and store all repository metadata and configuration data. We will be using docker compose to instantiate these services.
admin@linuxscratch:nexus_oss$ cat docker-compose.yml
services:
  postgresql:
    image: releases-docker.jfrog.io/postgres:17.6-alpine
    container_name: postgresql
    environment:
      - POSTGRES_DB=nexus
      - POSTGRES_USER=nexus
      - POSTGRES_PASSWORD=nexus@1234
    volumes:
      - ./init.sql:/docker-entrypoint-initdb.d/init.sql
      - postgres_data:/var/lib/postgresql/data

  nexus3:
    image: sonatype/nexus3:3.92.2
    container_name: nexus3
    depends_on:
      - postgresql
    environment:
      - NEXUS_SECURITY_INITIAL_PASSWORD=admin@1234
      - NEXUS_SECURITY_RANDOMPASSWORD=false
      - NEXUS_CONTEXT=nexus
      - NEXUS_DATASTORE_NEXUS_JDBCURL=jdbc:postgresql://postgresql:5432/nexus?currentSchema=nexus
      - NEXUS_DATASTORE_NEXUS_USERNAME=nexus
      - NEXUS_DATASTORE_NEXUS_PASSWORD=nexus@1234
      - NEXUS_DATASTORE_NEXUS_ADVANCED=maximumPoolSize=10
    ports:
      - "8081:8081" # Nexus UI
    volumes:
      - nexus-data:/nexus-data

volumes:
  nexus-data:
  postgres_data:
Within the postgres service we are going to run an init.sql script to create a schema named “nexus” and install an extension within this schema as shown below.
admin@linuxscratch:nexus_oss$ cat init.sql
-- Create the schema if it doesn't already exist
CREATE SCHEMA IF NOT EXISTS nexus;

-- Install the pg_trgm extension into the specific schema
CREATE EXTENSION IF NOT EXISTS pg_trgm SCHEMA nexus;
Now we are ready to launch our Nexus OSS service as shown below.
admin@linuxscratch:nexus_oss$ docker compose up -d
If this is the first time you are starting up the Nexus OSS service you need to complete the setup tasks when you launch the Nexus OSS portal.
URL: http://linuxscratch.stack.com:8081/nexus
Step3: Create AWS S3 Bucket
Now let’s create an AWS S3 bucket within a region specific to your AWS account.
Ensure that you have AWS CLI installed and configured with the credentials to connect and manage resource within your AWS region.
admin@linuxscratch:~/nexus_oss$ aws s3api create-bucket \
    --bucket nexus-store-$aws_account_id-ap-south-1-an \
    --bucket-namespace account-regional \
    --region ap-south-1 \
    --create-bucket-configuration LocationConstraint=ap-south-1
{
    "Location": "http://nexus-store-$aws_account_id-ap-south-1-an.s3.amazonaws.com/",
    "BucketArn": "arn:aws:s3:::nexus-store-$aws_account_id-ap-south-1-an"
}
Step4: Configure Nexus OSS S3 Object store
Let’s create AWS S3 object store within the Nexus OSS using the below REST API by passing the bucket details that we created and credentials required by Nexus OSS to manage AWS S3 object store.
The AWS access key and secret that you are going to use within below request need to have the required permissions on the AWS S3 bucket.
Follow “AWS Simple Storage Service (S3)” for more information on the same.
### Create S3 Blob store
POST http://linuxscratch.stack.com:8081/nexus/service/rest/v1/blobstores/s3
Authorization: Basic admin:admin@1234
Content-Type: application/json
Accept: application/json

{
  "name": "nexus_s3",
  "bucketConfiguration": {
    "bucket": {
      "region": "ap-south-1",
      "name": "nexus-store-184665269988-ap-south-1-an",
      "prefix": ""
    },
    "encryption": {
      "encryptionType": "s3ManagedEncryption"
    },
    "bucketSecurity": {
      "accessKeyId": "AKIASV7XIM3SFJK654XM",
      "secretAccessKey": "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"
    }
  }
}
Step5: Create Maven2 Hosted repository
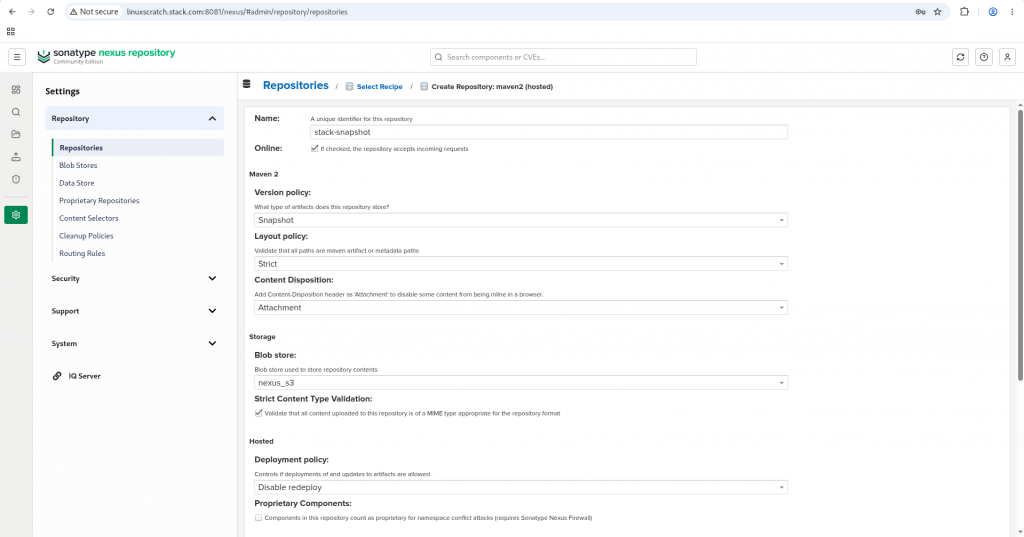
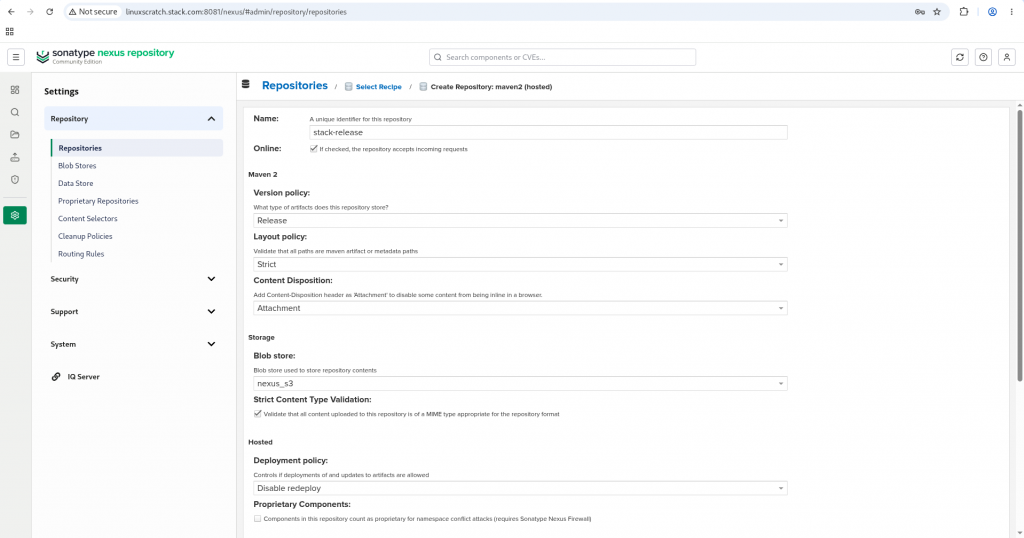
Navigate to Settings – Repositories – Create repository and create maven2 hosted snapshots and releases repository as shown below.
Step6: Create and Configure Java Project using maven
Here we are going to create a maven based project.
Ensure that you have maven and jdk25 installed on your machine for the same.
admin@linuxscratch:~$ mvn archetype:generate \
  -DarchetypeGroupId=org.apache.maven.archetypes \
  -DarchetypeArtifactId=maven-archetype-quickstart \
  -DarchetypeVersion=1.5 \
  -DjavaCompilerVersion=25 \
  -DgroupId=com.example \
  -DartifactId=nexus_demo \
  -DinteractiveMode=false
Once the project is created, switch into the folder “nexus_demo” and update the pom.xml as shown below.
...
<distributionManagement>
    <repository>
        <id>nexus_releases</id>
        <name>stack-release</name>
        <url>http://linuxscratch.stack.com:8081/nexus/repository/stack-release</url>
    </repository>
    <snapshotRepository>
        <id>nexus_snapshots</id>
        <name>stack-snapshot</name>
        <url>http://linuxscratch.stack.com:8081/nexus/repository/stack-snapshot</url>
    </snapshotRepository>
</distributionManagement>

...
Now let’s update maven settings.xml with the admin user credentials to connect to the nexus respository.
admin@linuxscratch:my-app$ cat ~/.m2/settings.xml
<settings>
    <servers>
        <server>
            <id>nexus_releases</id>
            <username>admin</username>
            <password>admin@1234</password>
        </server>
        <server>
            <id>nexus_snapshots</id>
            <username>admin</username>
            <password>admin@1234</password>
        </server>
    </servers>
</settings>
Step7: Build Maven Project
Here we will try to build the maven package and deploy it to the remote repository using the below commands.
admin@linuxscratch:nexus_demo$ mvn package
admin@linuxscratch:nexus_demo$ mvn deploy
Step8: Validate Nexus and AWS S3 bucket
Here we will validate the Nexus OSS repository to ensure that the artifacts are pushed and ensure that the S3 bucket is used to store the blobs related to these artifacts.
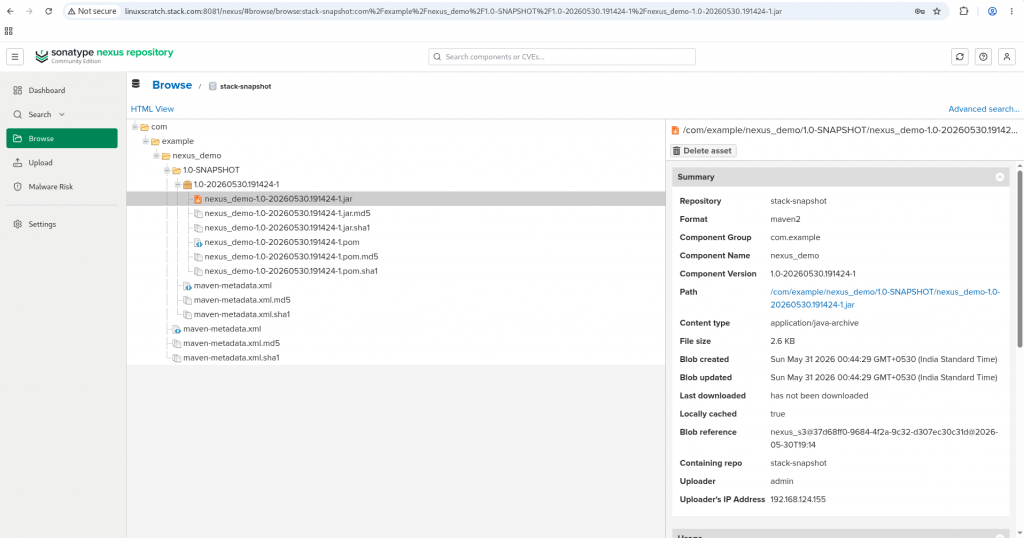
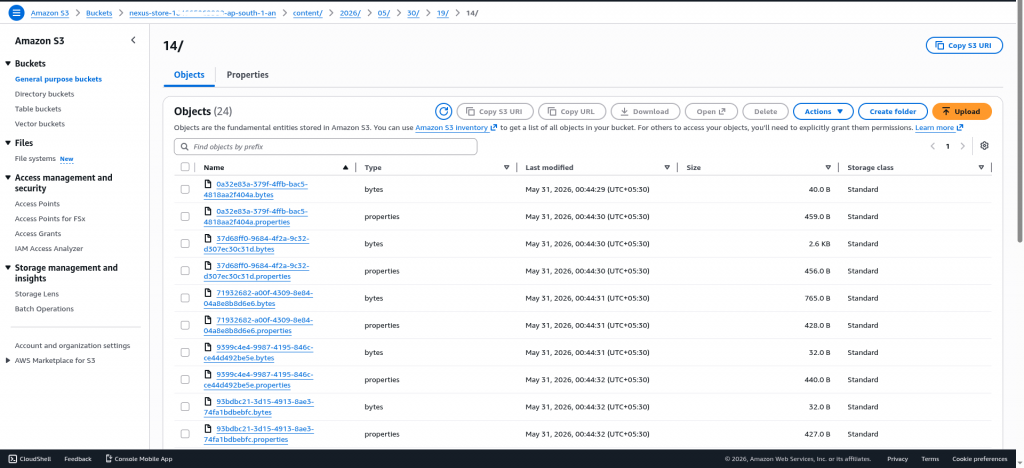
Similarly you can try to build the project is release mode and see that the artifacts are getting pushed into the release maven repository.
Hope you enjoyed reading this article. Thank you..

Related Posts