How to build and deploy serverless application using Knative

Here in this article we will use Knative which is an open-source, Kubernetes-based platform to build, deploy and manage serverless on a local kubernetes cluster.
Test Environment
- Fedora 41 server
- Docker version 27.5.1
- go1.23.10
What is Knative
Knative is an open-source, Kubernetes-based platform that provides tools and building blocks to deploy and manage serverless applications on any Kubernetes cluster. It enables serverless capabilities like on-demand scaling to zero, event-driven execution, and advanced traffic management by abstracting away complex Kubernetes operations.
Knative helps developers build applications faster by focusing on business logic rather than infrastructure, and supports various workloads, including APIs, microservices, and event-driven data pipelines.
High Level Architecture
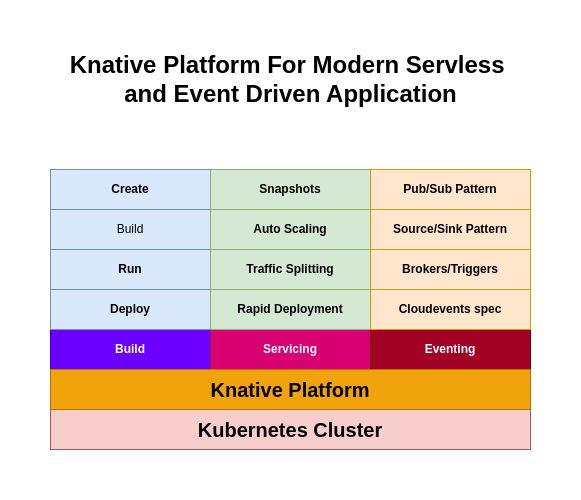
Components and Features
Serverless on Kubernetes:
Knative acts as an abstraction layer, turning any Kubernetes cluster into a serverless platform by automating the management of serverless workloads.
Simplified Development:
Developers can focus on writing code rather than managing infrastructure, as Knative handles tasks like auto-scaling, networking, and deployments.
Key Components:
- Serving: Manages the lifecycle of serverless workloads, handling autoscaling, revisions (point-in-time snapshots), and traffic routing.
- Eventing: Provides APIs for event-driven architectures, routing events from producers to consumers.
- Build: A component that helps build container images from source code, though this is a component rather than the entire “build” process itself.
If you are interested in watching the video. Here is the YouTube video on the same step by step procedure outlined below.
Procedure
Step1: Ensure kind is installed
KIND (Kubernetes IN Docker) is an open-source tool designed to run local Kubernetes clusters using Docker containers as “nodes.” It simplifies the process of creating and managing Kubernetes environments on a local machine, making it ideal for development, testing, and CI/CD pipelines.
admin@linuxser:~$ kind --version
kind version 0.30.0
Step2: Install knative cli
kn is the command line interface for managing Knative Serving and Eventing resources installed on kubernetes cluster.
Here we are downloading the binary release of knative cli and installing at “/usr/local/bin” location with execute permission set on it.
admin@linuxser:~$ wget https://github.com/knative/client/releases/download/knative-v1.19.4/kn-linux-amd64 -O kn
admin@linuxser:~$ chmod 755 kn
admin@linuxser:~$ sudo mv kn /usr/local/bin
Now, let’s verify the kn cli binary by checking it’s version as below.
admin@linuxser:~$ kn version
Version:      v1.19.4
Build Date:   2025-09-09 11:00:34
Git Revision: 62fdfbf2
Supported APIs:
* Serving
  - serving.knative.dev/v1 (knative-serving v1.19.4)
* Eventing
  - sources.knative.dev/v1 (knative-eventing v1.19.3)
  - eventing.knative.dev/v1 (knative-eventing v1.19.3)
Step3: Install knative quickstart plugin
knative quickstart plugin helps in setting a local knative kubernetes cluster environment with the required custom resource definitions installed for serving and eventing features.
Let’s download the binary version of the quickstart plugin and install it at “/usr/local/bin/” with execute permission set on it.
admin@linuxser:~$ wget https://github.com/knative-extensions/kn-plugin-quickstart/releases/download/knative-v1.19.3/kn-quickstart-linux-amd64 -O kn-quickstart
admin@linuxser:~$ chmod 755 kn-quickstart
admin@linuxser:~$ sudo mv kn-quickstart /usr/local/bin/
Let’s now list the available plugins.
admin@linuxser:~$ kn plugin list
- kn-quickstart : /usr/local/bin/kn-quickstart
We can verify quickstart plugin by printing the “–help” output for it.
admin@linuxser:~$ kn quickstart --help
Get up and running with a local Knative environment

Usage:
  kn-quickstart [command]

Available Commands:
  completion  Generate the autocompletion script for the specified shell
  help        Help about any command
  kind        Quickstart with Kind
  minikube    Quickstart with Minikube
  version     Prints the plugin version

Flags:
  -h, --help   help for kn-quickstart

Use "kn-quickstart [command] --help" for more information about a command.
Step4: Run knative quickstart plugin
The kn quickstart kind command is used to quickly install Knative and a local Kubernetes cluster using kind (Kubernetes in Docker). This command is part of the Knative kn CLI client and leverages kind to provide a convenient way to set up a local development environment for Knative.
admin@linuxser:~$ kn quickstart kind --kubernetes-version 1.34.0
Running Knative Quickstart using Kind
✅ Checking dependencies...
    Kind version is: 0.30.0

A local registry is no longer created by default.
    To create a local registry, use the --registry flag.

☸ Creating Kind cluster...
Creating cluster "knative" ...
 ✓ Ensuring node image (kindest/node:v1.34.0) 🖼
 ✓ Preparing nodes 📦
 ✓ Writing configuration 📜
 ✓ Starting control-plane 🕹️
 ✓ Installing CNI 🔌
 ✓ Installing StorageClass 💾
 ✓ Waiting ≤ 2m0s for control-plane = Ready ⏳
 • Ready after 18s 💚
Set kubectl context to "kind-knative"
You can now use your cluster with:

kubectl cluster-info --context kind-knative

Not sure what to do next? 😅  Check out https://kind.sigs.k8s.io/docs/user/quick-start/

🍿 Installing Knative Serving v1.19.4 ...
    CRDs installed...
    Core installed...
    Finished installing Knative Serving
🕸️ Installing Kourier networking layer v1.19.3 ...
    Kourier installed...
    Ingress patched...
    Finished installing Kourier Networking layer
🕸️ Configuring Kourier for Kind...
    Kourier service installed...
    Domain DNS set up...
    Finished configuring Kourier
🔥 Installing Knative Eventing v1.19.3 ...
    CRDs installed...
    Core installed...
    In-memory channel installed...
    Mt-channel broker installed...
    Example broker installed...
    Finished installing Knative Eventing
🚀 Knative install took: 6m26s
🎉 Now have some fun with Serverless and Event Driven Apps!
NOTE: Ensure nothing is running port 80 as quickstart uses it for its purpose.
Switch kubernetes cluster context to kind-knative.
admin@linuxser:~$ kubectl cluster-info --context kind-knative
Kubernetes control plane is running at https://127.0.0.1:33481
CoreDNS is running at https://127.0.0.1:33481/api/v1/namespaces/kube-system/services/kube-dns:dns/proxy

To further debug and diagnose cluster problems, use 'kubectl cluster-info dump'.
Now let’s verify the status of all the pods that are instantiated as a part of this quickstart installation.
admin@linuxser:~$ kubectl get pods -A
NAMESPACE            NAME                                            READY   STATUS    RESTARTS   AGE
knative-eventing     eventing-controller-766bcb9bdb-vwl66            1/1     Running   0          4m15s
knative-eventing     eventing-webhook-5db57b97b6-mqxkv               1/1     Running   0          4m15s
knative-eventing     imc-controller-7ccbcb69b7-z4rxb                 1/1     Running   0          3m19s
knative-eventing     imc-dispatcher-7c99f8985c-z5c55                 1/1     Running   0          3m19s
knative-eventing     job-sink-7ffc45c965-bchdc                       1/1     Running   0          4m15s
knative-eventing     mt-broker-controller-84b86685cc-xf8cx           1/1     Running   0          2m41s
knative-eventing     mt-broker-filter-6446586ff4-skk6r               1/1     Running   0          2m41s
knative-eventing     mt-broker-ingress-687b57b798-zksk8              1/1     Running   0          2m41s
knative-serving      activator-5f75594465-cnp9v                      1/1     Running   0          6m36s
knative-serving      autoscaler-8646c4f589-mlzxt                     1/1     Running   0          6m36s
knative-serving      controller-bd95775d4-h7zk2                      1/1     Running   0          6m36s
knative-serving      net-kourier-controller-5f67f6ddc8-wpwkr         1/1     Running   0          5m26s
knative-serving      webhook-6964f89cb9-hw9kf                        1/1     Running   0          6m36s
kourier-system       3scale-kourier-gateway-54fb555bd7-jc97l         1/1     Running   0          5m26s
kube-system          coredns-66bc5c9577-8sqbh                        1/1     Running   0          6m54s
kube-system          coredns-66bc5c9577-c4wvv                        1/1     Running   0          6m54s
kube-system          etcd-knative-control-plane                      1/1     Running   0          7m2s
kube-system          kindnet-zt9q5                                   1/1     Running   0          6m54s
kube-system          kube-apiserver-knative-control-plane            1/1     Running   0          7m1s
kube-system          kube-controller-manager-knative-control-plane   1/1     Running   0          7m1s
kube-system          kube-proxy-lzdtw                                1/1     Running   0          6m54s
kube-system          kube-scheduler-knative-control-plane            1/1     Running   0          7m1s
local-path-storage   local-path-provisioner-7b8c8ddbd6-zbtxd         1/1     Running   0          6m54s
Step5: Install Knative Function Cli
Knative Functions enables you to easily create, build, and deploy stateless, event-driven functions as Knative Services by using the func CLI.
Here we are going to install the binary version of knative func at “/usr/local/bin/” with execute permission set on it.
admin@linuxser:~$ wget https://github.com/knative/func/releases/download/knative-v1.19.2/func_linux_amd64 -O func
admin@linuxser:~$ chmod 755 func
admin@linuxser:~$ sudo mv func /usr/local/bin
admin@linuxser:~$ func version
v0.46.2
Step6: Create a Function
Here we are going to create a function in the current directory which is written in the language/runtime “go” and handles HTTP events.
admin@linuxser:~$ func create -l go hello
Created go function in /home/admin/hello
admin@linuxser:~$ ls -ltr /home/admin/hello
total 20
-rw-r--r--. 1 admin admin 1881 Sep 10 18:10 README.md
-rw-r--r--. 1 admin admin  506 Sep 10 18:10 handle_test.go
-rw-r--r--. 1 admin admin  483 Sep 10 18:10 handle.go
-rw-r--r--. 1 admin admin   25 Sep 10 18:10 go.mod
-rw-r--r--. 1 admin admin  302 Sep 10 18:10 func.yaml
Step7: Run Function
Change into the function directory and run the function locally from within its container. This is going to launch the function within a docker container.
Running a function creates an OCI container image for your function before running the function in your local environment, but does not deploy the function to a cluster.
admin@linuxser:~$ cd hello/
admin@linuxser:~/hello$ func run
go: downloading knative.dev/func-go v0.21.3
go: downloading github.com/rs/zerolog v1.32.0
go: downloading github.com/mattn/go-colorable v0.1.13
go: downloading golang.org/x/sys v0.18.0
{"level":"debug","time":1757508410,"message":"func runtime creating function instance"}
{"level":"debug","address":"127.0.0.1:8080","time":1757508410,"message":"function starting"}
{"level":"debug","time":1757508410,"message":"function does not implement Start. Skipping"}
{"level":"debug","time":1757508410,"message":"waiting for stop signals or errors"}
Running on host port 8080
Launch a new shell to check the docker container.
admin@linuxser:~$ docker ps
CONTAINER ID   IMAGE                  COMMAND                  CREATED          STATUS          PORTS                                              NAMES
1b6b7cdc4bf3   novicejava1/hello      "/cnb/process/web"       20 minutes ago   Up 20 minutes   127.0.0.1:8080->8080/tcp                           romantic_bouman
We can verify that the function has been successfully running by using the invoke command and observing the output.
admin@linuxser:~/hello$ func invoke
"POST / HTTP/1.1\r\nHost: localhost:8080\r\nAccept-Encoding: gzip\r\nContent-Length: 25\r\nContent-Type: application/json\r\nUser-Agent: Go-http-client/1.1\r\n\r\n{\"message\":\"Hello World\"}"
You will notice that these requests get logged in the output of the “func run” shell as shown below.
Received request
"POST / HTTP/1.1\r\nHost: localhost:8080\r\nAccept-Encoding: gzip\r\nContent-Length: 25\r\nContent-Type: application/json\r\nUser-Agent: Go-http-client/1.1\r\n\r\n{\"message\":\"Hello World\"}"
Step8: Build Function
Building a function creates an OCI container image for your function that can be pushed to a container registry. It does not run or deploy the function, which can be useful if you want to build a container image for your function locally, but do not want to automatically run the function or deploy it to a cluster.
admin@linuxser:~/hello$ func build
A registry for function images is required. For example, 'docker.io/tigerteam'.
? Registry for function images: docker.io/novicejava1
Note: building a function the first time will take longer than subsequent builds
Building function image
Still building
Still building
Yes, still building
Don't give up on me
Still building
This is taking a while
Still building
Still building
Yes, still building
🙌 Function built: index.docker.io/novicejava1/hello:latest
Step9: Deploy Function
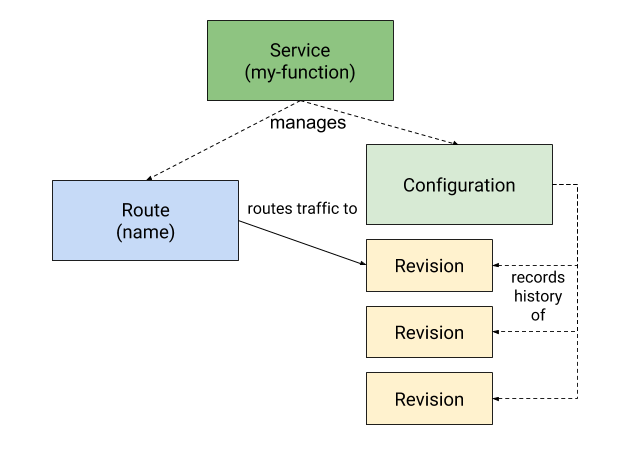
Deploying a function creates an OCI container image for your function, and pushes this container image to your image registry. The function is deployed to the cluster as a Knative Service. Redeploying a function updates the container image and resulting Service that is running on your cluster. Functions that have been deployed to a cluster are accessible on the cluster just like any other Knative Service.
The deploy creates a set of resources which are linked as shown in the knative serving object model below.
admin@linuxser:~/hello$ func deploy
function up-to-date. Force rebuild with --build
Pushing function image to the registry "index.docker.io" using the "novicejava1" user credentials
🎯 Creating Triggers on the cluster
✅ Function deployed in namespace "default" and exposed at URL:
   http://hello.default.127.0.0.1.sslip.io
Step10: Validate Function
Here let’s invoke the default (local or remote) running function with default values.
admin@linuxser:~/hello$ func invoke --verbose
Invoking '' function at http://hello.default.127.0.0.1.sslip.io
Sending values
  ID:
  Source: /boson/fn
  Type: boson.fn
  ContentType: application/json
  Data: {"message":"Hello World"}
Function invoked.  Response:
  Metadata:
    Date: Wed, 10 Sep 2025 13:39:32 GMT
    X-Envoy-Upstream-Service-Time: 1
    Server: envoy
    Content-Length: 407
    Content-Type: text/plain; charset=utf-8
  Content:
"POST / HTTP/1.1\r\nHost: hello.default.127.0.0.1.sslip.io\r\nAccept-Encoding: gzip\r\nContent-Length: 25\r\nContent-Type: application/json\r\nForwarded: for=10.244.0.10;proto=http\r\nK-Proxy-Request: activator\r\nUser-Agent: Go-http-client/1.1\r\nX-Forwarded-For: 10.244.0.10, 10.244.0.5\r\nX-Forwarded-Proto: http\r\nX-Request-Id: cbe6ffbb-d257-4ce0-998e-4d02b23b4255\r\n\r\n{\"message\":\"Hello World\"}"
or
admin@linuxser:~/hello$ curl http://hello.default.127.0.0.1.sslip.io -d {"message":"Hello World"}
"POST / HTTP/1.1\r\nHost: hello.default.127.0.0.1.sslip.io\r\nAccept: */*\r\nContent-Length: 21\r\nContent-Type: application/x-www-form-urlencoded\r\nForwarded: for=10.244.0.10;proto=http\r\nK-Proxy-Request: activator\r\nUser-Agent: curl/8.9.1\r\nX-Forwarded-For: 10.244.0.10, 10.244.0.5\r\nX-Forwarded-Proto: http\r\nX-Request-Id: 7822e870-7804-475d-8a32-dfd2d6dc5840\r\n\r\n{message:Hello World}"
Step11: Update Function and Redeploy
Let’s update the “handle.go” println message as shown below and deploy the function with force build.
admin@linuxser:~/hello$ cat handle.go
...
	fmt.Println("Voila!!! Received request")
...
admin@linuxser:~/hello$ func deploy --build
Now if we look at the services and revision list here is what it will look like.
admin@linuxser:~/hello$ kn service list
NAME    URL                                       LATEST        AGE     CONDITIONS   READY   REASON
hello   http://hello.default.127.0.0.1.sslip.io   hello-00002   9m27s   3 OK / 3     True
admin@linuxser:~/hello$ kn revisions list
NAME          SERVICE   TRAFFIC   TAGS   GENERATION   AGE     CONDITIONS   READY   REASON
hello-00002   hello     100%             2            85s     4 OK / 4     True
hello-00001   hello                      1            9m32s   3 OK / 4     True
Our services now routes 100 % of the traffic to hello-0002 revision. You can check the logs of the pod that has been created as shown below with the update message.
admin@linuxser:~/hello$ kubectl logs hello-00002-deployment-5b8bb654b5-fn6lm
Initializing HTTP function
listening on http port 8080
Voila!!! Received request
"POST / HTTP/1.1\r\nHost: hello.default.127.0.0.1.sslip.io\r\nAccept: */*\r\nContent-Length: 21\r\nContent-Type: application/x-www-form-urlencoded\r\nForwarded: for=10.244.0.2;proto=http\r\nK-Proxy-Request: activator\r\nUser-Agent: curl/8.9.1\r\nX-Forwarded-For: 10.244.0.2, 10.244.0.6\r\nX-Forwarded-Proto: http\r\nX-Request-Id: 12ab646d-0dca-4247-97f1-0b300d07f6cf\r\n\r\n{message:Hello World}"
If we want to split the traffic between these two revisions 50% each we can do so by updating our service as shown below.
admin@linuxser:~/hello$ kn service update hello --traffic hello-00001=80 --traffic @latest=20
Now if we check the traffic split between these two available revision, it will be as follows.
admin@linuxser:~/hello$ kn revision list
NAME          SERVICE   TRAFFIC   TAGS   GENERATION   AGE   CONDITIONS   READY   REASON
hello-00002   hello     20%              2            13m   3 OK / 4     True
hello-00001   hello     80%              1            22m   3 OK / 4     True
When to Choose Which
Choose Knative when:
You want a serverless experience on Kubernetes, need automatic scaling, event-driven architectures, simplified deployment pipelines, and managed infrastructure.
Choose “Normal Build” (Standard Kubernetes) when:
You require fine-grained control over every aspect of your deployment, or your application doesn’t fit the serverless pattern and would benefit from a more flexible, lower-level Kubernetes configuration.
Hope you enjoyed reading this article. Thank you..
Leave a Reply
You must be logged in to post a comment.