How to implement messaging application using NATS
Here in this article we will try to use NATS a modern messaging platform for IoT, Edge and Microservices devices to demonstrate messaging modes such as reply/request and pub/sub.
Test Environment
- Fedora 41 server
What is NATS
NATS is an Opensource and High Performance Messaging System. Its a connective technology that powers modern distributed systems. A connective technology is basically responsible for addressing, discovery and exchanging of messages.

Modern distributed systems are defined by an ever increasing number of hyper-connected moving parts and the additional data they generate. They employ both services and streams to drive business value. These modern systems present challenges to technologies that have been used to connect mobile front ends to fairly static backends.
As microservices, functions, and stream processing are being asked to move to the edge, these technologies and the assumptions they make are being challenged.
NATS messaging platform can be divided into two parts.
- Core: It provides standard messaging api
- JetStream: Its a layer on top of NATS core that provides persistence streaming and all materialized views of data like key-value and object store
If you are interested in watching the video. Here is the YouTube video on the same step by step procedure outlined below.
Procedure
Step1: Download NATS binary
The NATS server itself has minimal hardware requirements to support small edge devices, but can take advantage of more resources if available.
Here we will install NATS server using the Command Line method where in we will download the binary and install it locally as shown below.
admin@linuxser:~$ curl -sf https://binaries.nats.dev/nats-io/nats-server/v2@v2.10.20 | sh

admin@linuxser:~$ ls -ltr nats-server
-rwxr-xr-x. 1 admin admin 15761408 Jul 17 15:51 nats-server
Step2: Run NATS server
The simplest version of a NATS service infrastructure is a single nats-server process. The nats-server binary is highly optimized, very lightweight and extremely efficient in its resources’ usage.
We can start a NATS server with the default setting by just running the binary. By default security is disabled in this mode.
admin@linuxser:~$ ./nats-server
[1368] 2025/07/17 15:55:06.244904 [INF] Starting nats-server
[1368] 2025/07/17 15:55:06.245005 [INF]   Version:  2.10.20
[1368] 2025/07/17 15:55:06.245009 [INF]   Git:      [7140387]
[1368] 2025/07/17 15:55:06.245012 [INF]   Name:     NCSEZQ4DQZIYSA56JAODHWMAF6HU5TMEB2CZ5WKI3KQJIGLSEHJAQORF
[1368] 2025/07/17 15:55:06.245014 [INF]   ID:       NCSEZQ4DQZIYSA56JAODHWMAF6HU5TMEB2CZ5WKI3KQJIGLSEHJAQORF
[1368] 2025/07/17 15:55:06.245842 [INF] Listening for client connections on 0.0.0.0:4222
[1368] 2025/07/17 15:55:06.246550 [INF] Server is ready
Step3: Install NATS client tool
NATS supports different client libraries written in different languages. As of this writing it has almost 40+ client libraries. Here we will install nats a cli tool to interact with, test and manage NATS and JetStream from a terminal or from scripts.
Let’s install the latest version using the “go install” command as shown below. Ensure that you have go installed on your system.
admin@linuxser:~$ sudo dnf install go
admin@linuxser:~$ go install github.com/nats-io/natscli/nats@latest
Now let’s export the binary path of NATS CLI and validate the installed version. You can also do this export as a part of your shell startup script “~/.bashrc” by appending the following line to EOF and reload your shell terminal.
admin@linuxser:~$ export PATH=$PATH:~/go/bin
admin@linuxser:~$ nats --version
v0.2.3
Step4: Add Context
A nats cli context is basically named configurations with the configuration details to communicate with the nats server. Here we will add the default configuration to communicate with our server running locally.
admin@linuxser:~$ nats context add localhost --description "Localhost"
NATS Configuration Context "localhost"

  Description: Localhost
  Server URLs: nats://127.0.0.1:4222
         Path: /home/admin/.config/nats/context/localhost.json
Now we can list the available contexts for our nats cli to communicate with the nats server as shown below.
admin@linuxser:~$ nats context ls
╭─────────────────────────╮
│      Known Contexts     │
├───────────┬─────────────┤
│ Name      │ Description │
├───────────┼─────────────┤
│ localhost │ Localhost   │
╰───────────┴─────────────╯
Step5: Create a request-reply messaging model
Here is the high level architecture of request-reply messaging model.
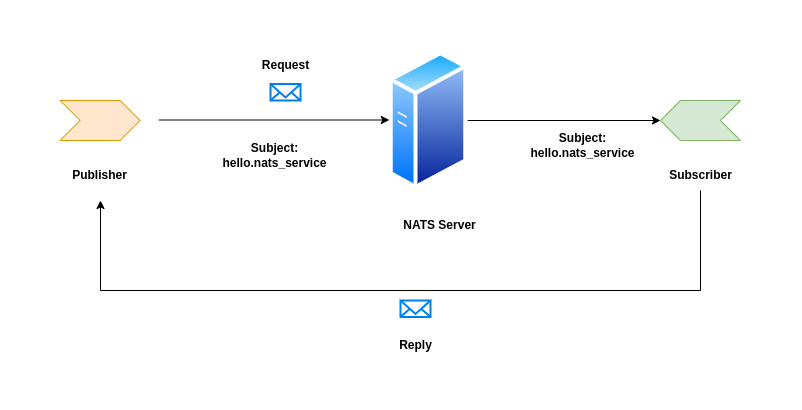
NATS is an interest based messaging system also can be known as subject based messaging system. Basically a client need to show some interest by subscribing to a particular subject or a subset of subjects on which its interested in getting messages.
In short, NATS uses the concept of subject based addressing. You can publish or subscribe to a series of token separated by period.
Let’s try to break down what a subject is all about in NATS. At its simplest, a subject is just a string of characters that form a name the publisher and subscriber can use to find each other. Subject which is string of character can be further sub-divided by a period to form a hierarchy of child subjects.
For example let’s say you have a store in multiple regions, you can define your subject as follows.
store.us
store.us.east
store.in
store.in.south
Let’s now create a simple NATS service named “nats_service” which replies with “Hey I am a service running on NATS..” for any request.
admin@linuxser:~$ nats reply hello.nats_service "Hey I am a service running on NATS.."
16:33:21 Listening on "hello.nats_service" in group "NATS-RPLY-22"
Let’s now send a request to our service with subject “hello.nats_service”. As you can see as soon as the request is sent our subject based service we have received a response which is sent by our service.
admin@linuxser:~$ nats request hello.nats_service
16:33:42 Reading payload from STDIN
16:33:42 Sending request on "hello.nats_service"
16:33:42 Received with rtt 665.908µs
Hey I am a service running on NATS..
We can ever verify the console logs of our service on the messages that are received by our clients.
admin@linuxser:~$ nats reply hello.nats_service "Hey I am a service running on NATS.."
16:33:21 Listening on "hello.nats_service" in group "NATS-RPLY-22"
16:33:42 [#0] Received on subject "hello.nats_service":
You can even send “n” number of request to the service. Let’s say if you want to send 10 requests to the service, we can use the “–count” option as shown below.
admin@linuxser:~$ nats request hello.nats_service --count 10
Step6: Create a publish-subscribe messaging model
Here is the high level architecture of the pub-sub flow model.
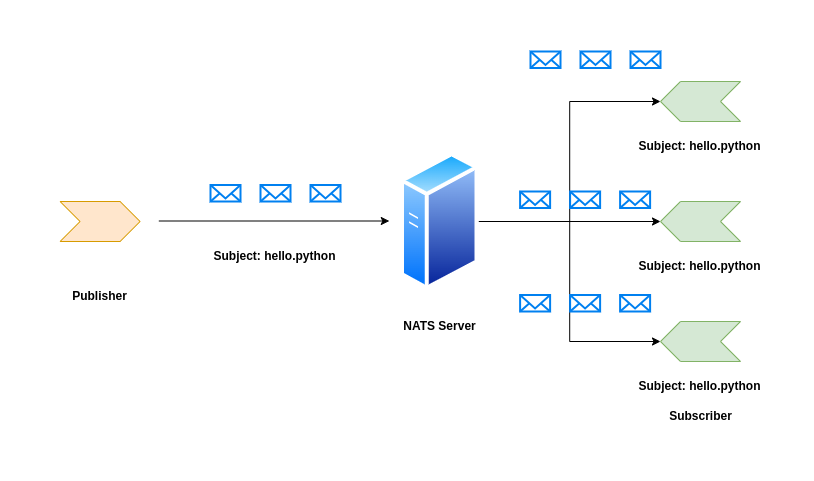
Let’s create a subscriber who is interested in the content related to python programming.
admin@linuxser:~$ nats sub hello.python
16:48:57 Subscribing on hello.python
Now let’s publish some content on the subject “hello.python” as shown below.
admin@linuxser:~$ nats pub hello.python "We are here to publish content on python"
16:47:12 Published 40 bytes to "hello.python"
Now if you check the subscriber console you would be receiving the content published on that channel as shown below.
admin@linuxser:~$ nats sub hello.python
16:48:57 Subscribing on hello.python
[#1] Received on "hello.python"
We are here to publish content on python
We can create a fan-out pattern with multiple subscribers and single publisher and fan-in pattern with one subscribe and multiple publisher as well.
Hope you enjoyed reading this article. Thank you..
Leave a Reply
You must be logged in to post a comment.