How to build a basic Web Application using Python Flask
Here in this article we will see how we can build a basic web application using some of the features of the Flask web framework. We will be building a online portal which can authenticate and save user profiles. Also we can save data related to the user and retrieve at a later stage.
Test Environment
Fedora 37 workstation
Flask
What is Flask
Flask is a python web application framework used to build web applications. Its basically a wrapper around Werkzeug which is a WSGI web application library. Werkzeug is a collection of libraries that can be used to create a WSGI (Web Server Gateway Interface) compatible web application in Python. Flask wraps Werkzeug, using it to handle the details of WSGI while providing more structure and patterns for defining powerful applications.
Features of Flask used in this web application
- Application Discovery
- HTTP Request Routing
- URL Building
- HTTP methods handling
- Static Files
- Rendering Templates
- Access Request Data
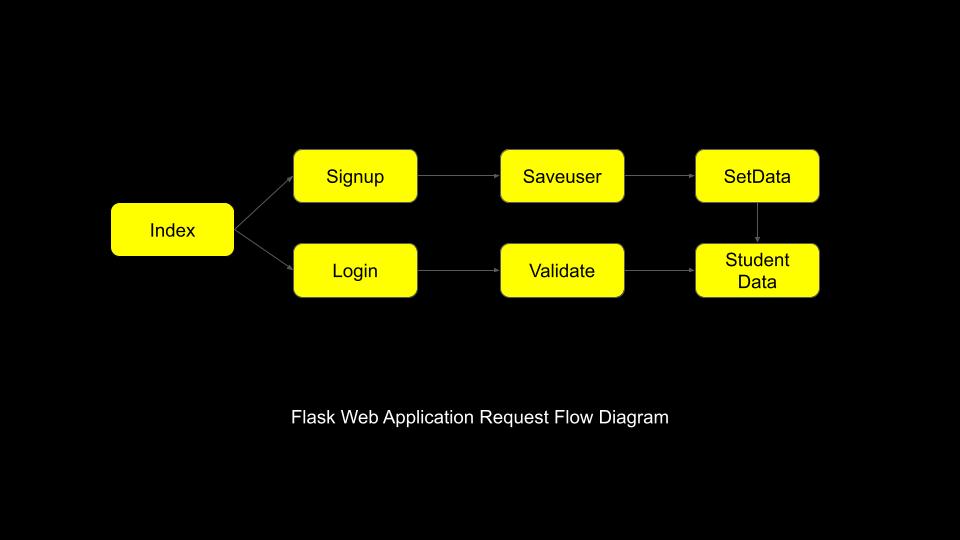
Here is the high level Request flow diagram of the Flask Application that we are going to build in this article.
If you are interested in watching the video. Here is the YouTube video on the same step by step procedure outlined below.
Procedure
Step1: Install Flask
As a first step ensure that the Flask python package is installed in your environment. You can create a virtual environment and install Flask in that virtual environment as per your choice. I am installing directly on my machine as here the focus is more on building a basic web application using flask.
[admin@fedser flask]$ pip install flask
Step2: Create a Skeleton Structure for Flask App
Here in this step we will be creating a skeleton for our Flask application with the structure as shown below. As you can see in the root directory of the project we have created a file named “app.py”. The main application file named in this way can be automatically discovered by the Flask command line utility to run the application.
[admin@fedser flask]$ mkdir studentdata
[admin@fedser flask]$ cd studentdata/
[admin@fedser flask]$ tree studentdata/
studentdata/
├── app.py
├── static
│   ├── signup.css
│   └── w3.css
└── templates
    ├── index.html
    ├── login.html
    ├── setdata.html
    ├── signup.html
    └── student.html
Step3: Create Skeleton functions in app.py
Here we have create multiple skeleton functions which when called will return a string. The first line is to load the Flask class using which an instance will be created and assigned to variable “app”. We are also defining a dictionary variable called “users” which will be utilized later in the next steps.
Each of the function is decorated with a line in the form “@app.route(“context”)” which basically tell the WSGI server to which function the request object should be routed in case a request is received with a particular context as specified in the double quotes within the route() method. Also a request can be of any type of method. By default if no method is specified it is assumed to support the GET method requests.
[admin@fedser flask]$ cd studentdata/
[admin@fedser studentdata]$ cat app.py
from flask import Flask

app = Flask(__name__)
users = {}

@app.route("/")
def index():
    return "Index Page"

@app.route("/signup")
def signup():
    return "Signup Page"

@app.route("/login")
def login():
    return "Login Page"

@app.route("/validate", methods=["POST"])
def validate():
	return "Login Unsuccessfull"

@app.route("/student/setdata", methods=["POST"])
def setdata():
	return "Set Student Data"

@app.route("/saveuser", methods=["POST"])
def saveuser():
	return "Save user profile"
We can launch our web application using the command line utility as shown below. This will launch the application on localhost with port 5000 by default. You can now try to access the GET request handling methods (ie. index, signup and login) as shown below.
[admin@fedser studentdata]$ flask run
URLs to validate
http://127.0.0.1:5000/
http://127.0.0.1:5000/signup
http://127.0.0.1:5000/login
So in this step we looked at the “ROUTE” feature and how we can associate Request METHODS with a particular context using “route”.
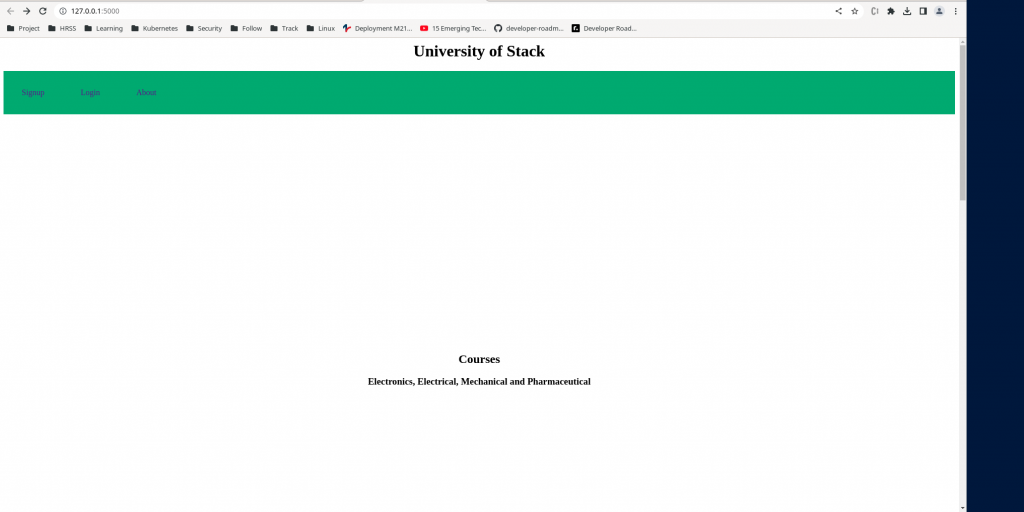
Step4: Create Index Page
We can return an index.html HTML formatted file from the function itself but that would not be a good idea. Rather we will utilize the feature of render_template to load the template and return it as an output. These template HTML files can be stored separately in a folder called “templates” as shown below.
Create an index.html template file in templates folder.
[admin@fedser studentdata]$ cat templates/index.html
<html>
<head>
<title>Student Info</title>
<meta name="viewport" content="width=device-width, initial-scale=1">
</head>
<body>
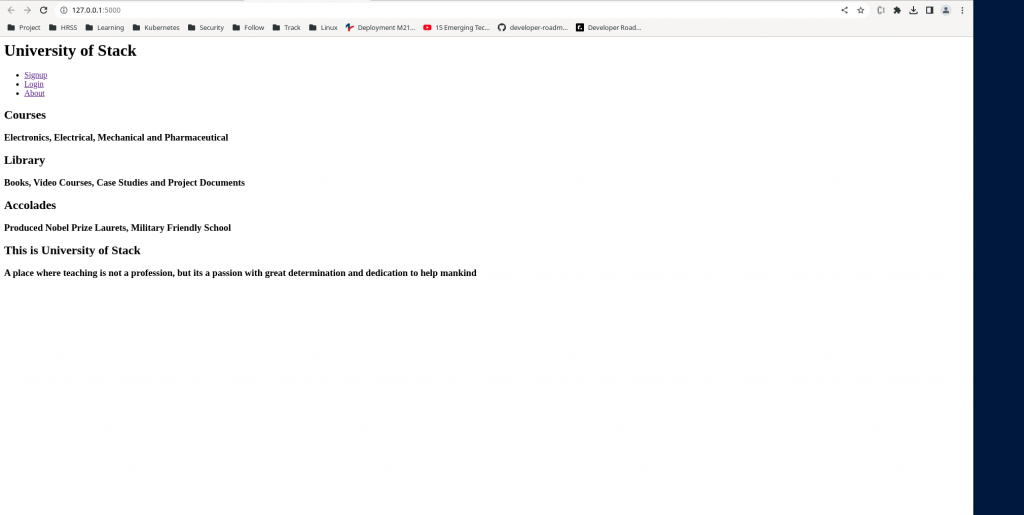
<h1>University of Stack</h1>
<div>
<ul>
<li>
<a href="/signup">Signup</a>
</li>
<li>
<a href=/login>Login</a>
</li>
<li>
<a href=#about>About</a>
</li>
</ul>
</div>
<div class="unicontainer" id="courses">
<h2>Courses</h2>
<h3>Electronics, Electrical, Mechanical and Pharmaceutical</h3>
</div>
<div class="unicontainer" id="library">
<h2>Library</h2>
<h3>Books, Video Courses, Case Studies and Project Documents</h3>
</div>
<div class="unicontainer" id="accolades">
<h2>Accolades</h2>
<h3>Produced Nobel Prize Laurets, Military Friendly School </h3>
</div>
<div class="unicontainer" id="about">
<h2>This is University of Stack</h2>
<h3>A place where teaching is not a profession, but its a passion with great determination and dedication to help mankind</h3>
</div>
</body>
</html>
Update app.py to load the template index.html from index function.
[admin@fedser studentdata]$ cat app.py
from flask import Flask

app = Flask(__name__)
users = {}

@app.route("/")
def index():
    return render_template('index.html', name=index)
...
Now let’s re-run the application and verify our index.html page.
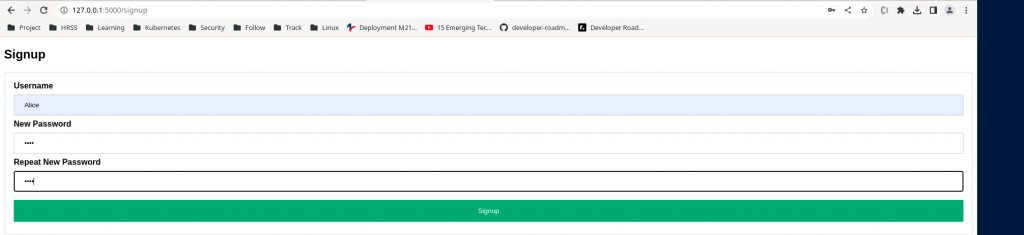
Step5: Create Signup Page
Similar to previous step we will create a template signup.html page and load it using render_template from signup function as shown below. Please note that this signup.html file submits a form with user details to “/saveuser” context which calls the function saveuser() from app.py. We will define this function in later step.
[admin@fedser studentdata]$ cat templates/signup.html
<!DOCTYPE html>
<html>
<head>
<meta name="viewport" content="width=device-width, initial-scale=1">
</head>
<body>

<h2>Signup</h2>

<form action="/saveuser" method="post">
  <div class="container">
    <label for="uname"><b>Username</b></label>
    <input type="text" placeholder="Enter Username" name="uname" required> <br>

    <label for="newpass"><b>New Password</b></label>
    <input type="password" placeholder="Enter New Password" name="newpass" required> <br>

    <label for="repeatpass"><b>Repeat New Password</b></label>
    <input type="password" placeholder="Repeat New Password" name="repeatpass" required> <br>

    <button type="submit">Signup</button>
  </div>
</form>

</body>
</html>
Update app.py to load the template signup.html from signup function.
[admin@fedser studentdata]$ cat app.py
from flask import Flask
from flask import render_template


app = Flask(__name__)
users = {}

@app.route("/")
def index():
    return render_template('index.html', name=index)

@app.route("/signup")
def signup():
    return render_template('signup.html', name=signup)
...
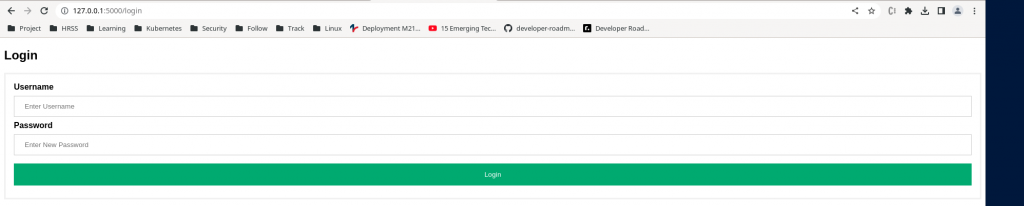
Step6: Create Login Page
Similar to previous step we will create a template login.html page and load it using render_template from login function as shown below. Please note that this login.html file submits a form with user details to “/validate” context which calls the function validate() from app.py. We will define this function in later step.
[admin@fedser studentdata]$ cat templates/login.html
<!DOCTYPE html>
<html>
<head>
<meta name="viewport" content="width=device-width, initial-scale=1">
</head>
<body>

<h2>Login</h2>

<form action=/validate method="post">
  <div class="container">
    <label for="uname"><b>Username</b></label>
    <input type="text" placeholder="Enter Username" name="uname" required> <br>

    <label for="newpass"><b>Password</b></label>
    <input type="password" placeholder="Enter New Password" name="newpass" required> <br>

    <button type="submit">Login</button>
  </div>
</form>

</body>
</html>
Update app.py to load the template login.html from login function.
[admin@fedser studentdata]$ cat app.py
from flask import Flask
from flask import render_template


app = Flask(__name__)
users = {}

@app.route("/")
def index():
    return render_template('index.html', name=index)

@app.route("/signup")
def signup():
    return render_template('signup.html', name=signup)

@app.route("/login")
def login():
    return render_template('login.html', name=login)
...
Now let’s re-run our application see if we have wired the login.html and signup.html correctly and they are able to post the form data to validate() and saveuser() functions respectively.


Step7: Build URL Dynamically
We have wired our signup and login pages from index.html page. But in all of these three templates we have manually provided the context url. Instead we can use the feature of url_for to build the URL for the specific function that we want to trigger from the template. We will be updating our index.html, signup.html and login.html as shown below to build the url dynamically.
Updated index.html.
[admin@fedser studentdata]$ cat templates/index.html
<html>
    <head>
        <title>Student Info</title>
        <meta name="viewport" content="width=device-width, initial-scale=1">
    </head>
    <body>
    <h1>University of Stack</h1>
    <div>
        <ul>
            <li>
                <a href={{ url_for('signup') }}>Signup</a>
            </li>
            <li>
                <a href={{ url_for('login') }}>Login</a>
            </li>
            <li>
                <a href=#about>About</a>
            </li>
        </ul>
    </div>
    <div class="unicontainer" id="courses">
        <h2>Courses</h2>
        <h3>Electronics, Electrical, Mechanical and Pharmaceutical</h3>
    </div>
    <div class="unicontainer" id="library">
        <h2>Library</h2>
        <h3>Books, Video Courses, Case Studies and Project Documents</h3>

    </div>
    <div class="unicontainer" id="accolades">
        <h2>Accolades</h2>
        <h3>Produced Nobel Prize Laurets, Military Friendly School </h3>
    </div>
    <div class="unicontainer" id="about">
        <h2>This is University of Stack</h2>
        <h3>A place where teaching is not a profession, but its a passion with great determination and dedication to help mankind</h3>

    </div>
    </body>
</html>
Updated signup.html
[admin@fedser studentdata]$ cat templates/signup.html
<!DOCTYPE html>
<html>
<head>
<meta name="viewport" content="width=device-width, initial-scale=1">
</head>
<body>

<h2>Signup</h2>

<form action={{ url_for('saveuser') }} method="post">
  <div class="container">
    <label for="uname"><b>Username</b></label>
    <input type="text" placeholder="Enter Username" name="uname" required> <br>

    <label for="newpass"><b>New Password</b></label>
    <input type="password" placeholder="Enter New Password" name="newpass" required> <br>

    <label for="repeatpass"><b>Repeat New Password</b></label>
    <input type="password" placeholder="Repeat New Password" name="repeatpass" required> <br>

    <button type="submit">Signup</button>
  </div>
</form>

</body>
</html>
Updated login.html.
[admin@fedser studentdata]$ cat templates/login.html
<!DOCTYPE html>
<html>
<head>
<meta name="viewport" content="width=device-width, initial-scale=1">
</head>
<body>

<h2>Login</h2>

<form action={{ url_for('validate') }} method="post">
  <div class="container">
    <label for="uname"><b>Username</b></label>
    <input type="text" placeholder="Enter Username" name="uname" required> <br>

    <label for="newpass"><b>Password</b></label>
    <input type="password" placeholder="Enter New Password" name="newpass" required> <br>

    <button type="submit">Login</button>
  </div>
</form>

</body>
</html>
Now, rerun your application and ensure that the signup and login functionally still work the same as previously without dynamic url configuration.
Step8: Update our saveuser functionality
Here we are now going to update our saveuser() functionality that gets trigger when ever a new user tries to signup from the signup.html page. We will using the feature of request object to capture the details of the POST data and save it to the users dictionary that we created in our earlier step.
Updated saveuser() functionality.
[admin@fedser studentdata]$ cat app.py
from flask import Flask
from flask import render_template
from flask import request
...
@app.route("/saveuser", methods=["POST"])
def saveuser():
    if request.method == 'POST':
        user = request.form['uname']
        newpass = request.form['newpass']
        repeatpass = request.form['repeatpass']

        print(user)
        print(newpass)
        print(repeatpass)
        if newpass == repeatpass:
            users[user] = {}
            users[user]['pass'] = newpass
            print(users)
            return render_template('setdata.html', user=user)
            #return setdata(user)
        else:
            return "User profile creation failed"
...
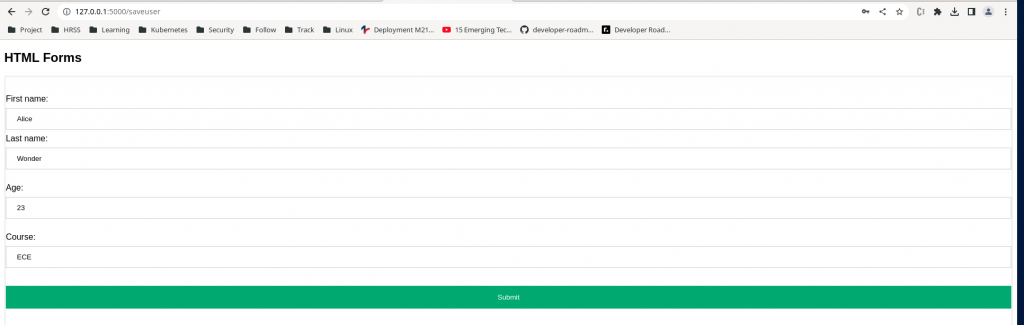
Here if you look into the code we are checking if the user who enters his password in the “New Password” and “Repeat New Password” matches. If that is the case the user details are stored in the dictionary “users” and the user is rendered with another template named setdata.html which actually captures more details about the user. Here we are passing the user object to the render_template.
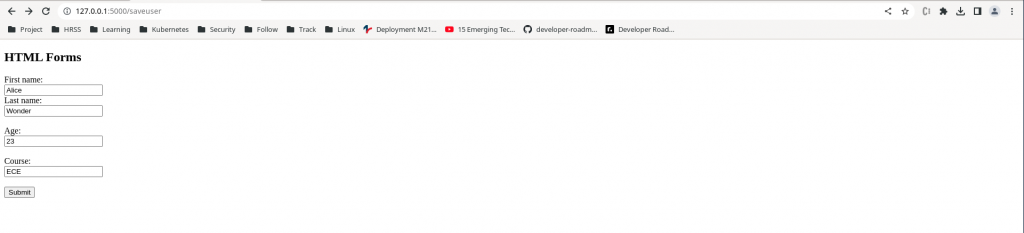
Create the setdata.html template file as shown below. This forms “POST” data to “/student/setdata” context which will store the details about the user.
[admin@fedser studentdata]$ cat templates/setdata.html
<!DOCTYPE html>
<html>
    <head>
        <title>Set Student Data</title>
        <meta name="viewport" content="width=device-width, initial-scale=1">
    </head>
<body>

<h2>HTML Forms</h2>

<form action={{ url_for('setdata') }} method="post">
  <div class="container"></div>
  <label for="fname">First name:</label><br>
  <input type="text" id="fname" name="firstname" value={{ user }}><br>
  <label for="lname">Last name:</label><br>
  <input type="text" id="lname" name="lastname" value="Doe"><br><br>
  <label for="age">Age:</label><br>
  <input type="integer" id="age" name="age" value="1"><br><br>
  <label for="course">Course:</label><br>
  <input type="text" id="course" name="course" value="MPC"><br><br>

  <button type="submit">Submit</button>
  <div class="container">
</form>

</body>
</html>
Updated app.py.
[admin@fedser studentdata]$ cat app.py
from flask import Flask
from flask import render_template
from flask import request
...
@app.route("/student/setdata", methods=["POST"])
def setdata():
    if request.method == 'POST':
        firstname = request.form['firstname']
        lastname = request.form['lastname']
        age = request.form['age']
        course = request.form['course']
        users[firstname]['firstname'] = firstname
        users[firstname]['lastname'] = lastname
        users[firstname]['age'] = age
        users[firstname]['course'] = course
        print(firstname, lastname, age, course)
        print(users)
        #return "%s, %s, %s, %s" % (firstname, lastname, str(age), course)
        return render_template('student.html', firstname=firstname, lastname=lastname, age=age, course=course)
...
Here in the setdata.html form we are capturing the users firstname, lastname, age and course details and saving it to users dictionary as shown above.
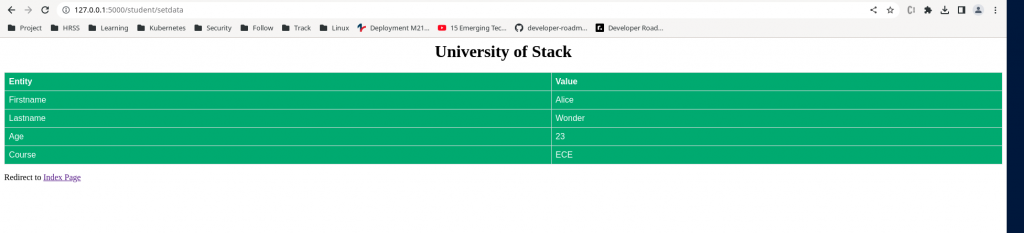
Step9: Render the User details
Once the user details are saved to the dictionary we are calling the student.html template file which will render the details about that user whose details were captured. We are passing the firstname, lastname, age and course details the render_template to render those details.
[admin@fedser studentdata]$ cat templates/student.html
<html>
    <head>
        <title>Student Info</title>
        <link rel="stylesheet" href={{ url_for('static', filename='w3.css') }}>
    </head>
    <body>
    <h1>University of Stack</h1>
    <div class="container">
        <ul>
            <table>
                <tr>
                  <th>Entity</th>
                  <th>Value</th>
                </tr>
                <tr>
                  <td>Firstname</td>
                  <td>{{ firstname }}</td>
                </tr>
                <tr>
                  <td>Lastname</td>
                  <td>{{ lastname }}</td>
                </tr>
                <tr>
                  <td>Age</td>
                  <td>{{ age }}</td>
                </tr>
                <tr>
                  <td>Course</td>
                  <td>{{ course }}</td>
                </tr>
              </table>
        </ul>
    </div>
    <div>
        <p> Redirect to <a href={{ url_for('index') }}>Index Page</a></p>
    </div>
</body>
</html>
Now let’s try to re-run our application and capture the user details.

Step10: Update our validate functionality
Here we are now going to update our validate() functionality that gets trigger when ever a user tries to login from the login.html page. We will using the feature of request object to capture the details of the POST data and authenticate the users based on the password that’s saved in the users dictionary. Once the user is authenticated we will be rendering the details of the user using the same render_template as shown below.
Updated validate() functionality.
[admin@fedser studentdata]$ cat app.py
from flask import Flask
from flask import render_template
from flask import request
...
@app.route("/validate", methods=["POST"])
def validate():
    if request.method == 'POST':
        uname = request.form['uname']
        newpass = request.form['newpass']
        if uname in users.keys():
            print("User exists")
            value = users[uname]['pass']
            if newpass == value:
                print("Password matches")
                firstname = users[uname]['firstname']
                lastname = users[uname]['lastname']
                age = users[uname]['age']
                course = users[uname]['course']
                #return "Login Succeded"
                return render_template('student.html', firstname=firstname, lastname=lastname, age=age, course=course)
            else:
                return "Login Unsuccessfull"
...
Re-run the application and login with the user that just signed up. As we storing the users data temporarily using a dictionary we need to first signup a new user, save the user details and then try to login with that user by redirecting the Index Page.

Step11: Create the static CSS files
I am not that good at CSS but managed to update and use the below CSS files for signup and login page to give a better look. You can update them as per your convenience.
Here in this step we are introducing the concept the static CSS files which will be used within the template HTML files.
Create signup.css file.
[admin@fedser studentdata]$ cat static/signup.css
body {font-family: Arial, Helvetica, sans-serif;}
form {border: 3px solid #f1f1f1;}

input[type=text], input[type=password], input[type=integer] {
  width: 100%;
  padding: 12px 20px;
  margin: 8px 0;
  display: inline-block;
  border: 1px solid #ccc;
  box-sizing: border-box;
}

button {
  background-color: #04AA6D;
  color: white;
  padding: 14px 20px;
  margin: 8px 0;
  border: none;
  cursor: pointer;
  width: 100%;
}

button:hover {
  opacity: 0.8;
}

.cancelbtn {
  width: auto;
  padding: 10px 18px;
  background-color: #f44336;
}

.imgcontainer {
  text-align: center;
  margin: 24px 0 12px 0;
}

img.avatar {
  width: 40%;
  border-radius: 50%;
}

.container {
  padding: 16px;
}

span.psw {
  float: right;
  padding-top: 16px;
}

/* Change styles for span and cancel button on extra small screens */
@media screen and (max-width: 300px) {
  span.psw {
     display: block;
     float: none;
  }
  .cancelbtn {
     width: 100%;
  }
}
Create w3.css file.
[admin@fedser studentdata]$ cat static/w3.css
h1 {
text-align: center;
}

ul {
  list-style-type: none;
  margin: 0;
  padding: 0;
  overflow: hidden;
  background-color: #04AA6D;
}

li {
  float:left;
  margin: 10px;
  padding:10px;
}

li a {
  display: block;
  color: white
  text-align: center;
  padding: 14px 16px;
  text-decoration: none;
}

li a:hover {
  background-color: #04AA6D;
}

.unicontainer {
margin-top: 25%;
margin-bottom: 25%;
text-align: center;

}

.studentdata {
  display: block;
  background-color: white;

}

#courses {
  display: block;
  margin-top: 25%;
  margin-bottom: 25%;
}

table {
  font-family: arial, sans-serif;
  border-collapse: collapse;
  width: 100%;
}

td, th {
  border: 1px solid #dddddd;
  text-align: left;
  padding: 8px;
  color: white;
}
Update index.html, login.html, setdata.html, signup.html and student.html with the CSS styles sheet reference as shown below. We are going to use the url_for feature of Flask to build the static file reference as shown below.
Updated index.html.
[admin@fedser studentdata]$ cat templates/index.html
<html>
    <head>
        <title>Student Info</title>
        <meta name="viewport" content="width=device-width, initial-scale=1">
	<link rel="stylesheet" href={{ url_for('static', filename='w3.css') }}>
    </head>
...
Updated login.html
[admin@fedser studentdata]$ cat templates/login.html
<!DOCTYPE html>
<html>
<head>
<meta name="viewport" content="width=device-width, initial-scale=1">
<link rel="stylesheet" href={{ url_for('static', filename='signup.css') }}>
</head>
...
Updated setdata.html.
[admin@fedser studentdata]$ cat templates/setdata.html
<!DOCTYPE html>
<html>
    <head>
        <title>Set Student Data</title>
        <meta name="viewport" content="width=device-width, initial-scale=1">
	<link rel="stylesheet" href={{ url_for('static', filename='signup.css') }}>
    </head>
...
Updated signup.html.
[admin@fedser studentdata]$ cat templates/signup.html
<!DOCTYPE html>
<html>
<head>
<meta name="viewport" content="width=device-width, initial-scale=1">
<link rel="stylesheet" href={{ url_for('static', filename='signup.css') }}>
</head>
...
Updated student.html.
[admin@fedser studentdata]$ cat templates/student.html
<html>
    <head>
        <title>Student Info</title>
        <link rel="stylesheet" href={{ url_for('static', filename='w3.css') }}>
    </head>
...
Step12: Re-run Flask Application
Now, the web application should be ready with CSS stylesheets applied.
Hope you enjoyed reading this article. Thank you..
Leave a Reply
You must be logged in to post a comment.