How to use StackLayout to arrange buttons and play sound on event press

Here in this video we will try to use StackLayout to build a basic application with Button widgets arranged with different types of orientation supported by this layout and also we will try to bind the Button on_press event to a callback function named playsound which will play a sound file whenever a button is clicked.
Test Environment
Fedora 31
Kivy 1.11.1
What is StackLayout
StackLayout is a kind of Layout which helps in arranging child widgets in left, right and top, bottom combination or vice – versa. It tries to arrange widgets in either horizontal or vertical direction with same or varying size as many as the layout can fit.
If you are interested in watching the video. Here is the YouTube video on the same step by step procedure outlined below.
Procedure
Step1: Create stackapp.py
Here in this step we are extending the StackLayout base call with MyStackLayout child class which will be the root widget element for this application. This will launch an empty window with MyStackLayout as the root widget element.
[admin@fed31 stackingapp]$ cat stackapp.py
#!/usr/bin/env python

import kivy
kivy.require('1.11.1')

from kivy.app import App
from kivy.uix.stacklayout import StackLayout

class MyStackLayout(StackLayout):
    pass


class StackApp(App):

    def build(self):
        return MyStackLayout()

if __name__ == '__main__':
    StackApp().run()
Step2: Create stackapp.kv
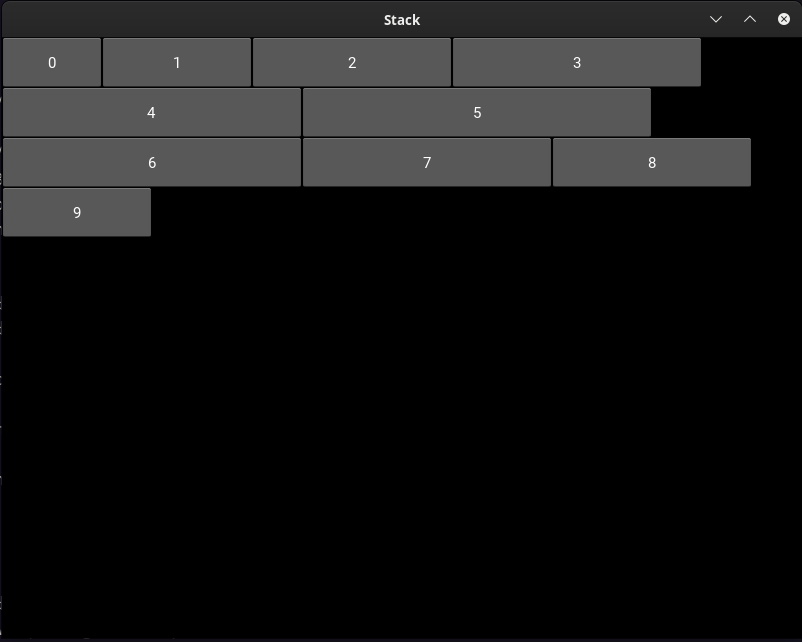
In this stackapp.kv file we will define the UI representation of our application. We have added multiple child Button widgets into the root MyStackLayout Widget with an orientation from left-right and top-bottom arrangement. Each of the Button size is kept different just for understanding purpose that StackLayout can take up multiple child widgets of any size. The child widgets can also be of the same size.
[admin@fed31 stackingapp]$ cat stackapp.kv
#:kivy 1.11.1

<MyStackLayout>:
    orientation: 'lr-tb'
    Button:
        text: '0'
        size_hint: (None, None)
        size: 100, 50
    Button:
        text: '1'
        size_hint: (None, None)
        size: 150, 50
    Button:
        text: '2'
        size_hint: (None, None)
        size: 200, 50
    Button:
        text: '3'
        size_hint: (None, None)
        size: 250, 50
    Button:
        text: '4'
        size_hint: (None, None)
        size: 300, 50
    Button:
        text: '5'
        size_hint: (None, None)
        size: 350, 50
    Button:
        text: '6'
        size_hint: (None, None)
        size: 300, 50
    Button:
        text: '7'
        size_hint: (None, None)
        size: 250, 50
    Button:
        text: '8'
        size_hint: (None, None)
        size: 200, 50
    Button:
        text: '9'
        size_hint: (None, None)
        size: 150, 50
Step3: Bind the on_presss Button event with a callback function to play sound
Now, that we have our UI ready, we will try to bind our Button on_press event with a callback function named playsound() which will load a sound file and play it whenever a button is clicked.
For this we first need to define the on_press event in the .kv file which will call the function name playsound() as shown below.
[admin@fed31 stackingapp]$ cat stackapp.kv
#:kivy 1.11.1

<MyStackLayout>:
    orientation: 'lr-tb'
    Button:
        text: '0'
        size_hint: (None, None)
        size: 100, 50
        on_press: root.playsound()
    Button:
        text: '1'
        size_hint: (None, None)
        size: 150, 50
        on_press: root.playsound()
    Button:
        text: '2'
        size_hint: (None, None)
        size: 200, 50
        on_press: root.playsound()
    Button:
        text: '3'
        size_hint: (None, None)
        size: 250, 50
        on_press: root.playsound()
    Button:
        text: '4'
        size_hint: (None, None)
        size: 300, 50
        on_press: root.playsound()
    Button:
        text: '5'
        size_hint: (None, None)
        size: 350, 50
        on_press: root.playsound()
    Button:
        text: '6'
        size_hint: (None, None)
        size: 300, 50
        on_press: root.playsound()
    Button:
        text: '7'
        size_hint: (None, None)
        size: 250, 50
        on_press: root.playsound()
    Button:
        text: '8'
        size_hint: (None, None)
        size: 200, 50
        on_press: root.playsound()
    Button:
        text: '9'
        size_hint: (None, None)
        size: 150, 50
        on_press: root.playsound()
Next, we need to modify our stackapp.py python script to import the SoundLoader class which will be used to load a sound wav file. We also need to define the callback function named playsound() in MyPageLayout root widget class as shown below.
Note, please include the sound wav file in your current working directory so that its picked up for loading and playing when the application is executed.
[admin@fed31 stackingapp]$ cat stackapp.py
#!/usr/bin/env python

import kivy
kivy.require('1.11.1')

from kivy.app import App
from kivy.uix.stacklayout import StackLayout
from kivy.core.audio import SoundLoader

class MyStackLayout(StackLayout):
    def playsound(self):
        sound = SoundLoader.load('click.wav')
        sound.play()


class StackApp(App):

    def build(self):
        return MyStackLayout()

if __name__ == '__main__':
    StackApp().run()
Step4: Validate Application
Now we have completed all our required modification to the .kv file and .py file which when executed will launch our application with multiple buttons which when clicked will play a sound file named click.wav. Also here is the completed source code on github.
[admin@fedser stackingapp]$ python stackapp.py

Hope you enjoyed reading this article. Thank you..
Leave a Reply
You must be logged in to post a comment.